Hosting Public IPs on a Fritz!Box router
UPDATE
Try using this process instead. It has been updated since I wrote this page and now seems to work as expected, although setting the service up offline is best, i.e. machine not connected to the FritzBox:
Setting up a public IPv4 subnet in the FRITZ!Box
The FRITZ!Box can also be used on an internet connection with multiple fixed (“static”) public IPv4 addresses. This way you can offer your server services or internet applications in the internet under different public IP addresses.
Requirements / Restrictions
The internet service provider must supply you with a public IPv4 subnet for your internet connection. The FRITZ!Box uses the first IPv4 address of the IPv4 subnet for itself; the other IPv4 addresses can be used by devices in the home network.
Whilst your computer can have dual NICs, the Fritz!Box will detect them both and give them the same host name. You must change this FIRST (see below)
Do not allow DHCP to run on the NIC using the public IP, or the Fritz!Box will adopt it and give it an internal IP and noe of the rest of this tutorial will work until you have corrected that and deleted the entry for that NIC in the Fritz!Box
Note
All instructions on configuration and settings given in this guide refer to the latest FRITZ!OS for the FRITZ!Box.
Setting up a public IPv4 subnet in the FRITZ!Box
Click “Home Network” in the FRITZ!Box user interface.
Click “Network” in the “Home Network” menu.
Click on the “Network Settings” tab.
Click “Additional Settings” in the section “LAN Settings” to display all of the settings.
Click the “IPv4 Settings” button.
Enter the public IPv4 subnet that you received from your internet service provider in the “Prefix” and “Network mask” fields in the “Public IPv4 Subnet” section.
Click “Apply” to save the settings.
Configuring a network device
Configure the NICs intended to host the Public IP, for example a second network adapter on a computer connected to the FRITZ!Box that should be accessible at an IP address from the FRITZ!Box’s public IPv4 subnet.
For the IP address, enter an IP address from the public IPv4 network. This IP address may not already be used by another device in the FRITZ!Box home network.
For the subnet mask, enter the subnet mask that corresponds to the public IP address.
If necessary, enter one of the internet service provider’s default gateways as the default gateway.
As the preferred and alternative DNS server, enter the DNS server of the internet service provider.
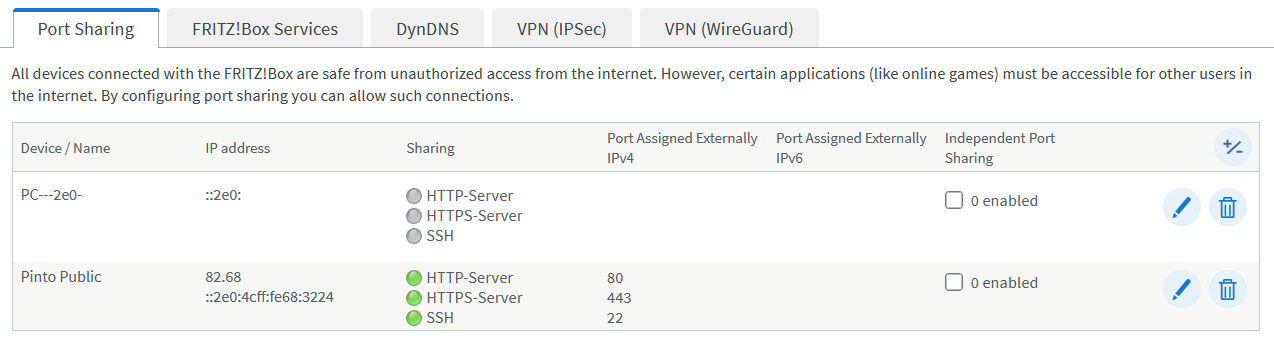
Setting up port sharing in the FRITZ!Box
Configure port sharing in the FRITZ!Box for the IP addresses from the public IPv4 subnet so that your server services or internet applications can be reached in the internet.
If your device is already connected to the network and has been detected by the Fritz!Box:
Change the NAME of the device - it will have the same name as the NIC with a local connection, and the Fritz!Box uses that host name to identify services, so it will error out.
Click “Home Network > Network” in the user interface and find the entry corresponding to your public NIC.
Make sure the IP address issued is the public one. If not, you will have to delete the entry and switch off DHCP in your public NICs host computer.
Once the entry has the right public IP listed, click the edit button on the entry that corresponds to your public NIC.
Change the name of the entry to something you will remember, such as ‘PUBLIC’.
Save your choice and make sure that the entry is now changed in the Network list, has the right IP address and a unique name.
Click “Internet” in the FRITZ!Box user interface.
Click “Permit Access” in the “Internet” menu.
Click on the “Port Sharing” tab.
Click “Add Device for Sharing”.
Select “Enter the IP address manually” from the drop-down list “Device”.
In the “IPv4 address” field, enter the public IP address that you assigned to the device.
Click “New Sharing”.
Enable the option “Port sharing”.
Select “Other application” from the drop-down list “Application”.
Enter a name of your choice for the port sharing rule in the “Name” field.
Select the IP protocol (TCP, UDP, ESP or GRE) required by the server service or internet application from the drop-down list “Protocol”.
Note
- The IP protocols ESP and GRE are only required for VPN server services.
To enable port sharing for a single port, enter the number of the port used by the server service or internet application to accept connections in the “Port to device”, “to port”, and “Port requested externally (IPv4)” fields.
To enable port sharing for a port range:
In the “Port to device” field, enter the number of the first port used by the server service or internet application to accept connections, and in the “to port” field, enter the number of last port. In the “Port requested externally (IPv4)” field, enter the number of the first port used by the server service or internet application to accept connections.
Enable the sharing.
Click “Apply” to save the settings.